
DIY: Black Straws Snoot Grid (Part 1)
Hi again and welcome,
here is a new idea you can start doing by yourself.
When I was on one of my trips, this time to London, for a great Strobist Seminar we went into a Mexican restaurant and as by David advice on getting all the Black Straws you could pick I decided to try my luck.
I ask the waitress if I could get some black straws and she just said grab the one's you like... so as you can imagine I took 2 hands full of it !!!! :)
Later on I decided that was time to put together the so talked snoot grid but I could not imagine how to assemble it, since I have never did it before. I then realized that a lot of people also did not bother to assemble it, maybe because of lacking how or because they simply did not know what was it all about.
In this 2 parts simple "Do It Yourself" we take a look first on how to assemble the "THING" and then on the second part I will do some examples on what you could come up with them.
Hope you enjoy it and come back soon for the second part.
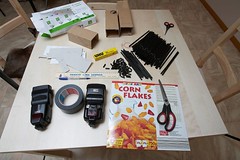
Working table with all the gear needed to assemble the Black Straws Snoot Grid.
- Black duct tape
- Cereal Box (Any type or any kind)
- Scissors
- Glue
- Hand full of Black Straws (0,5 cm diameter)
- Ruler
- Portable flash to try it out later
- Pen
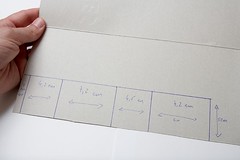
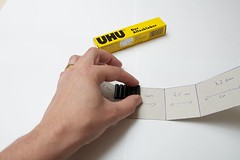
This is the design on the cereal card box for the 2cm Black Straws Snoot Grid. There is an error on the calculation between the picture and the real thing since I have some Velcro at the flashes end and it gives 0,2cm more to each side (If you have the Velcro at the end of your flash use the measures on the picture instead), sorry but I only noticed it now here goes correct the measures:
1cm, 4,5cm, 7cm, 4,5cm, 7cm and length 5cm
This will give 2cm for the straw and the other 3 to fit in the flash and will fit on SB26 and 580EX
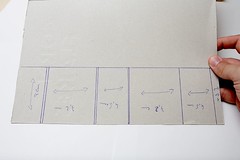
This is the design on the cereal card box for the 5cm Black Straws Snoot Grid.
This fits on SB26 and 580EX:
7cm, 4,5cm, 7cm, 4,5cm, 1cm and length 8cm
This will give 5cm for the straw and the other 3 to fit in the flash.
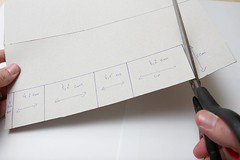
Cut with scissors the card box as showed.
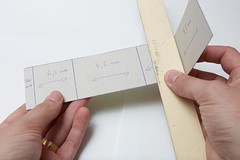
After cutting the card box use the ruler to help you bend the card box on the marks.

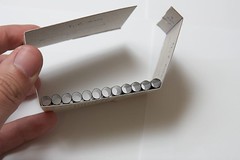
After bending all the parts here is how it should become.
After bending all the parts here is how it should become. Do not glue it yet!! On my left hand you can see the 1cm part that will be for assembling the structure together.
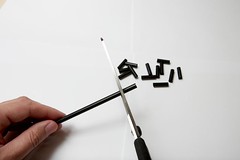
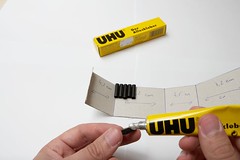
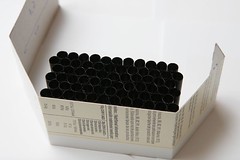
Cut the straws with scissors and pay attention that they tend to pop out after each cut ;). Illustration for the 2cm cut for the 5cm is the same only the straw pieces would come out bigger.
Now it's time to glue them to the card box. Start to glue them to the longest part of the card box this way will be easier to glue everything later on.
Start to align them at the front of the card box... don't mind if the back part (the one that stays inside the card box) is not precisely align it will work anyway. What you have to keep in mind is to align the front.
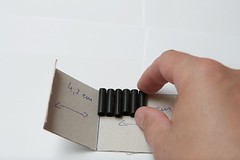
Here you can see some of the straws on the back are not aligned but they are glued :)
First row now glued this is what it will look like after all of them are glued. Carry on gluing...
A couple of rows later...
A couple of rows later...
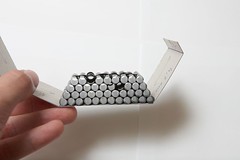
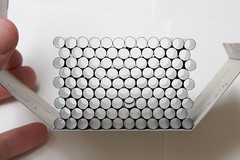
Try it out before you close it... this way you can ad or remove straws so it can stay aligned.
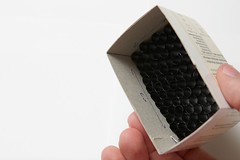
The inside after all the gluing has finished.
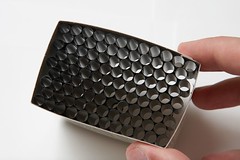
Done. This is how it look after it's finished.
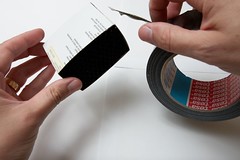
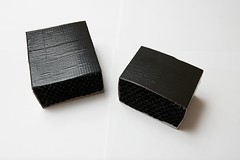
Now tape it to look more professional and to cover those unpaid ads :)
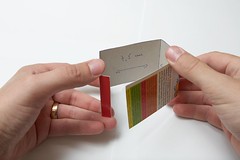
Here are the 5cm (L) and the 2cm (R) with that black tape professional look :), just look through them, you can even see what will be coming out of this...
Hope you like this photo tutorial and make use of this tools since they are very good and if you loose one you can always make another ;)
Don't miss part 2 of this series since it will bring you some examples how you can use your new Black Straws Snoot Grids.
Until next time... go shoot!!!
here is a new idea you can start doing by yourself.
When I was on one of my trips, this time to London, for a great Strobist Seminar we went into a Mexican restaurant and as by David advice on getting all the Black Straws you could pick I decided to try my luck.
I ask the waitress if I could get some black straws and she just said grab the one's you like... so as you can imagine I took 2 hands full of it !!!! :)
Later on I decided that was time to put together the so talked snoot grid but I could not imagine how to assemble it, since I have never did it before. I then realized that a lot of people also did not bother to assemble it, maybe because of lacking how or because they simply did not know what was it all about.
In this 2 parts simple "Do It Yourself" we take a look first on how to assemble the "THING" and then on the second part I will do some examples on what you could come up with them.
Hope you enjoy it and come back soon for the second part.
Working table with all the gear needed to assemble the Black Straws Snoot Grid.
- Black duct tape
- Cereal Box (Any type or any kind)
- Scissors
- Glue
- Hand full of Black Straws (0,5 cm diameter)
- Ruler
- Portable flash to try it out later
- Pen
This is the design on the cereal card box for the 2cm Black Straws Snoot Grid. There is an error on the calculation between the picture and the real thing since I have some Velcro at the flashes end and it gives 0,2cm more to each side (If you have the Velcro at the end of your flash use the measures on the picture instead), sorry but I only noticed it now here goes correct the measures:
1cm, 4,5cm, 7cm, 4,5cm, 7cm and length 5cm
This will give 2cm for the straw and the other 3 to fit in the flash and will fit on SB26 and 580EX
This is the design on the cereal card box for the 5cm Black Straws Snoot Grid.
This fits on SB26 and 580EX:
7cm, 4,5cm, 7cm, 4,5cm, 1cm and length 8cm
This will give 5cm for the straw and the other 3 to fit in the flash.
Cut with scissors the card box as showed.
After cutting the card box use the ruler to help you bend the card box on the marks.
After bending all the parts here is how it should become.
After bending all the parts here is how it should become. Do not glue it yet!! On my left hand you can see the 1cm part that will be for assembling the structure together.
Cut the straws with scissors and pay attention that they tend to pop out after each cut ;). Illustration for the 2cm cut for the 5cm is the same only the straw pieces would come out bigger.
Now it's time to glue them to the card box. Start to glue them to the longest part of the card box this way will be easier to glue everything later on.
Start to align them at the front of the card box... don't mind if the back part (the one that stays inside the card box) is not precisely align it will work anyway. What you have to keep in mind is to align the front.
Here you can see some of the straws on the back are not aligned but they are glued :)

First row now glued this is what it will look like after all of them are glued. Carry on gluing...
A couple of rows later...

A couple of rows later...
Try it out before you close it... this way you can ad or remove straws so it can stay aligned.
The inside after all the gluing has finished.
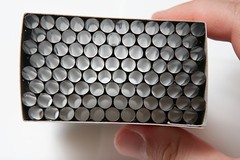

Done. This is how it look after it's finished.
Now tape it to look more professional and to cover those unpaid ads :)
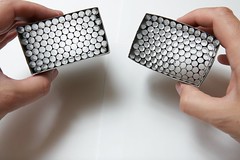
Here are the 5cm (L) and the 2cm (R) with that black tape professional look :), just look through them, you can even see what will be coming out of this...
Hope you like this photo tutorial and make use of this tools since they are very good and if you loose one you can always make another ;)
Don't miss part 2 of this series since it will bring you some examples how you can use your new Black Straws Snoot Grids.
Until next time... go shoot!!!
No hay comentarios:
Publicar un comentario